What Is This?
If you like what you see above, and you kind of want something like that for yourself, then you have come to the right place. Today I'm going to show you how to make this animation, and if you follow my steps, then you will be able to create something cool like that.
Where To Start
First off, make sure you have Adobe Photoshop installed to where ever you intend on creating this, because that is the tool I used. Once you have it, open the application and hover over the file tab and click "new" to start.
Then a window like this one should pop up.
I named my animation oliviamarkeyname, but you can name it whatever keeps you organized.
Next, make the dimensions 600 x 200 and make sure it is on pixels.
After you have done that press the "OK" button. You should get something like you see below.
Next, go to the text tool, which is on the left and is the letter "T".
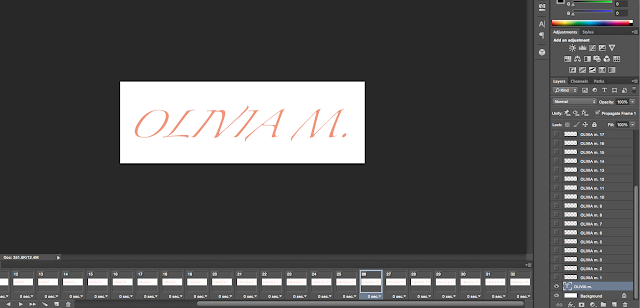
With the text tool, you will write your name, and if you have a long name, maybe put a nickname or just your first name and last initial like I did.
Next, go to your layers and make the text layer with your name visible by clicking the little box until there is an eye replacing it.
Once you have done that, on the first layer which is the OLIVIA m. 1 on my screen, you will use the eraser tool (which is over on the bar where you found the text tool) and begin to erase the last letters of your name.
For each time you erase, make a new layer.
(And so on and so forth)
Once you have your full name erased, open the timeline (not the video timeline) and go to the little tab on the timeline. When you click that, this window should show up.
Click on the "Make Frames From Layers"
All Your layers should then appear in your timeline. Once they are there, go back to the layer tab and highlight all of your layers.
Delete any layers that are in your timeline that are extra, like the one white layer in the picture above.
Then make sure that the text layer and background is visible in all of the layers on the timeline, by selecting either all or just an individual layer and clicking the eye in the layer tab.
If you would like, you can add a little effect at the end of your animation. (Look back at my animation at the beginning of this if you want to see what I did.)
You can use any of the effects you see on the left of the window. I used the Bevel & Emboss Contour tool and then just pressed ok. To add this, you just make a new layer in your layer tab and then it should add it to your timeline.
That is how my animation looked with the Contour.
After the layers with your special effect are on your timeline, then go to the bottom of the timeline and you should see a button with these balls on them that are fading backwards. (Right next to the new layer and trash can)
This tool make the transition to your special effect a lot smoother and easier by adding more layers so you do not have to do any more work.
Now, go back to that little tab on the timeline where you went to make frames from layers. You will now click on Reverse Frames.
Finally, press play on the timeline and you should get something like this.
You Are Finished!
Now you have created your very own animation writing your name! Congratulations!
I hope you enjoyed this tutorial and comment down below any questions, comments, and concerns.
:-)


